Map basics
Create and reuse areas
Draw your own boundary or save one from a place search, then use it to focus your work.
Start with a place
An area is a boundary you save in My Areas. Create one before looking for data if you already know where you want to work. You can reuse it in catalog searches and spatial queries; saving an area alone does not filter your data.
Draw an area
Use drawing for a boundary that you choose yourself, such as a study site or a neighborhood around several locations.
- On the map, open Tools and select Area (Draw an area).
- Click around the boundary to place its corners, then double-click to finish. Select Cancel or press Esc to abandon the drawing.
- The finished polygon is saved and selected in My Areas. In its details, replace the default name with something recognizable, such as Harbor study area. Press Enter or leave the Name field to save.
Open Tools, draw a polygon, and save it as Station study area. Silent walkthrough using the real app.
Read the text walkthrough
- With the sample stations already imported, open Tools on the map and choose Area.
- Click to place the boundary corners, then double-click the final corner to finish. The app saves the polygon in My Areas.
- In the selected area’s details, change Name to Station study area and press Enter.
Save an area from search
Use place search for a city, park, or region with a known name. If the map says Place search requires Terrain, switch from the photorealistic view to Terrain first.
- Select Find a place or area, enter a name, and select Search. Include a region or country if the name is ambiguous.
- Review the result’s full place name and its Boundary or Extent badge. Use Go to visit the location without saving it.
- Select Add to save the result in My Areas and zoom to it. Check the shape on the map, then rename it in its details if needed.
- Boundary uses the returned polygon. Extent uses a rectangle around the result when a boundary is unavailable; it is not an exact administrative border.
- If nothing matches, try a broader name or draw the area yourself.
Search for Central Park, check the Boundary badge, and select Add to keep it in My Areas. Recorded with live place-search results; results may change.
Read the text walkthrough
- Open Find a place or area and search for Central Park, New York.
- Check the full place name and Boundary badge. Go visits a result; Add saves its boundary.
- Select Add. Central Park appears in My Areas and its boundary is shown on the map.
Use the same area across your workflow
A saved area gives you a consistent place to start, whether you are finding a source or narrowing its records.
- In the catalog or Discover panel, open the location control and choose the area from your saved areas. This finds sources whose coverage overlaps the area.
- In a supported layer’s query editor, go to Area and choose the saved area in the geometry controls. Choose the relationship, review the preview, and apply the query.
- Queries copy the area’s geometry when you select it. Changing or deleting the saved area does not update an existing query; select the area again and apply to use a new boundary.
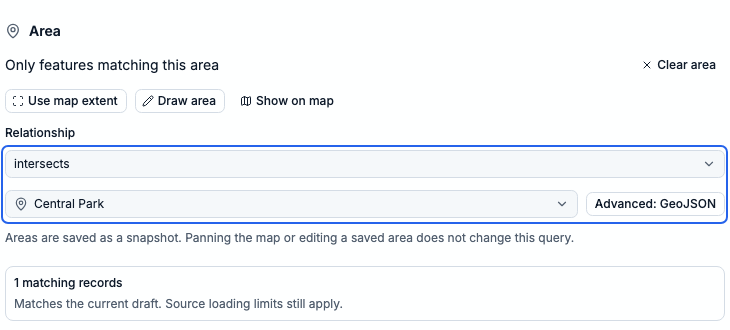
In Area, choose Central Park and the intersects relationship. The preview checks the draft before you apply it. Shown with a synthetic ArcGIS sample source; area filtering depends on the source’s capabilities.
Keep your areas
Select an area to rename it or choose Delete area in its details to remove it. Save a project to include your areas when moving to another device or sharing your work.