Explore data
Build a query
Choose which records belong on your map using attributes, an area, and time.
Open the query editor
Select a feature layer in the Layers panel, then choose Query → Edit query in its settings. Queries are available for GeoJSON and imported features, queryable ArcGIS feature layers, and supported catalog data feeds. Imagery and tile layers do not have this feature query editor.
Filter by attributes
Under Attributes, add a condition, choose a field, choose an operator, and enter a value. The fields and operators come from your source, so the choices can differ between layers.
- Start with one condition and check the preview. For the stations CSV in the import guide, choose temperature, a greater-than operator, and 20.
- Add more conditions as needed. ALL requires every condition to match. ANY requires at least one to match.
- Use a nested group when you need to combine ALL and ANY. For example, match active records AND either of two categories.
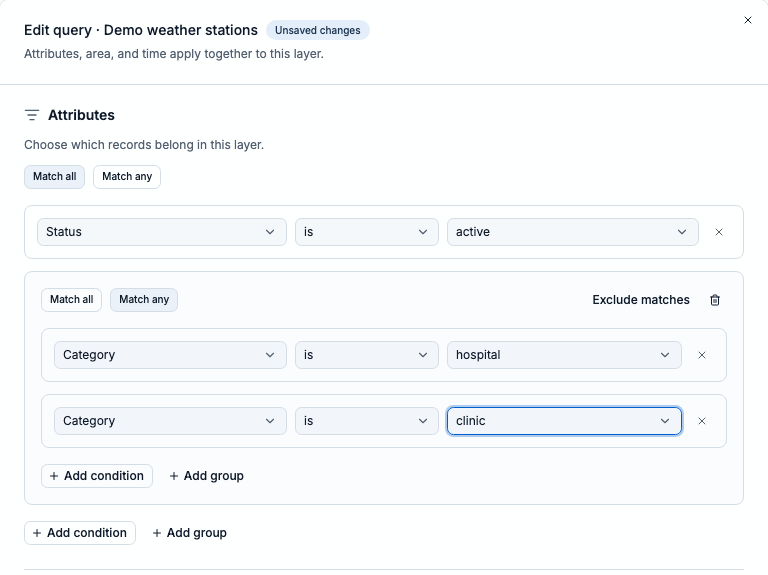
The outer group requires active status. The nested group accepts either hospital or clinic. These are illustrative fields in the synthetic sample feed.
ALL
  status equals active
  ANY
    category equals hospital
    category equals clinic
This finds active hospitals and active clinics. Use the field names and values from your own source; this is an illustration, not text to paste into the editor.
Add an area or time window
Under Area, use Use map extent or Draw area when available. You can also use the geometry controls to select a saved area or paste GeoJSON. Choose the spatial relationship your source supports; distance filters also need a distance and unit.
- Use Show on map to check the chosen geometry. Use Clear area to remove the spatial restriction.
- Map extents and saved areas are copied into the query. Panning the map or changing a saved area does not update that copy; select the area again and apply the query to use a new boundary.
- For sources with time support, use Time to follow the timeline, set a custom window, or ignore time filtering. Check the time field when one is required.
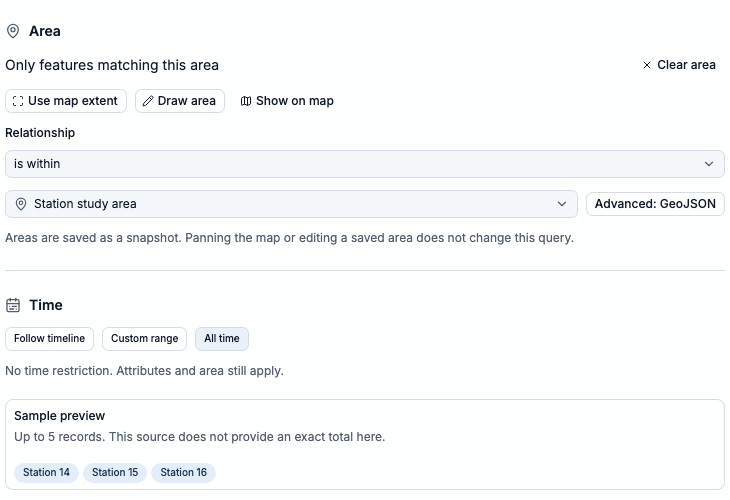
Station study area restricts the query to records within its boundary. All time leaves time unrestricted; choose Follow timeline or Custom range when needed.
Preview, then apply
The preview shows a matching-record count or a small sample, depending on the source. It reflects your draft; source loading limits still apply. Select Apply query to update the layer. When adding a new source, finish with the editor’s add action instead.
- No matches? Check values and field types, then widen the area or time window. ALL groups can quickly become too restrictive.
- Preview unavailable? Check the source connection and any validation messages before applying.
- To start over, choose Clear all filters, then Apply query. This clears attributes and area and sets the layer to ignore time filtering.
Map query or table filter?
Edit query changes which features the layer fetches or displays on the map. The data analyzer’s Filter control only narrows its table. Use the layer query when you want your map to change; use a table filter when you want to inspect a subset of records.